Wednesday, November 26, 2008

Featured Gift of the Day: Polka Dot Hobo Bag


Today's featured gift is a great brown and white polka dot hobo style bag. I really love this bag and had a hard time keeping it for myself! Both the outside and inside have brown and white cotton blend polka dot fabric. The outside of the handles are made with a rayon blend brown and white flower pattern. The inside of the handles have a soft brown faux suede.

For today's entry once again, I am not going to go into step by step details. Instead, I am going to give a word to the wise on fabric choice. I am really happy with how this purse finally turned out. HOWEVER, it was a pain to sew! Rayon blends and faux suede do not mix well, even if the final result is fabulous! So as a precautionary tale I would tell you to try sewing a few small swatches together to see how they work before starting a big project. And never forget that when sewing lightweight material to heavy material, fusible interfacing is your friend! Ironing interfacing onto your lightweight fabric helps this process immensely. But the most important tip is never be afraid to try new fabric combinations. I did struggle a bit with the rayon and suede, but the results were fantastic.

Happy Crafting!

p.s. as a totally unrelated matter, next week I will be hosting my first giveaway. This time I will be giving away my own stuff. Eventually I plan to give away other great products. More details to follow next week.
Tuesday, November 25, 2008

Today's Featured Gift Item: Swallow Necklace and Bracelet Set

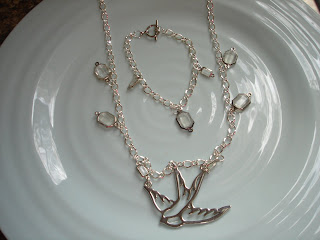
Today's featured gift is a great necklace and bracelet set. The necklace is quite long, around 20 inches. It hangs quite nicely. It has a swallow charm and crystal square charms. The matching bracelet has square crystal charms. Today, rather than disscuss step by step how I made it, I'm going to give some more generic tips for jewelry making.


  1. Have the right tools!
    I know this sound cliche, but having good tools saves you a lot of headache! The 2 tools you cannot live without (at least I can't!) are a wire cutters and a needle-nosed pliers. I actually have two neddle-nosed, one big and one small. I also have a jewelry bending pliers (it has round ends rather than flat ones). It also helps if you make necklaces to have a beading board. These have grooves in them so you can lay out your beads in order before strining them.

  2. Take your time.
    The more I try to hurry when making something, the more jump rings go flying, things keep breaking and beads go scattering all over the floor. I find by taking my time I do a much better job of making quality pieces.

  3. Look over your work when you're finished.
    I often have this problem. I think I'm done with a piece and then just lay it aside. Then later when I or someone else is wearing it, something comes off. This is especially easy to do when working with jump rings. Test out your jewelry. Spin the charms/beads around a few times to make sure they're attached well. Also, I use split rings as often as I can. These are like tiny key rings that you have to work harder to get on your jewelry, but that also makes them much harder to come off than plain jump rings.

I hope these tips are helpful. Ask questions in comments if you would like more information.
Happy Crafting!

Monday, November 24, 2008

Today's Featured Gift Item: Seaside Wine Charms

I promised to write a bit each day about my featured gift items. Today's featured item is a great set of four seaside wine charms. They normally are priced at $8.00. For today only, they are $6.00.


The charms were made using gold and silver toned charms. There is an anchor, a ship wheel, conch shell, and a fish in front of coral. The beads are glass and are in the colors that remind me of the sea, turquoise, green and a green/blue as well as some additional clear beads. These are made using basic beading and jewelry techniques. First, I added a bead or two to the wire charm hoop. Then I put a jump ring on each charm and added that to the hoop. I finished by putting matching beads on the other side of the charm. Then I carefully bent the end of each hoop with a pliers to make a small catch to close the hoops on.

These charms would make a great gift for the wine lover. I know I am one!

Happy Crafting!

Wednesday, November 19, 2008

Button Wreath Ornament Tutorial

I thought I would share a little Christmas spirit with this tutorial on making a button wreath. I got the idea from Martha Stewart's website. But I didn't like how the faces of the buttons were covered up. So I decided to make my own.

Here's what you need:
wire (I used 26 gauge and remember the bigger the number, the smaller the wire!)
wire cutters
buttons
ribbon

First: Cut a length of wire. I think I originally cut about 10 inches, but you can use different lengths to get different sizes of ornaments. Then choose a button for the bottom center of your wreath. I choose a big red coat button. These can be a little tricky as they don't like to stay on the wire by themselves.


Thread it onto the wire like this.


Choose your next button. I picked a little shiny green one (yay Christmas!). Thread the wire through one hole of the button.

From trial and error, I have found out the best way to tread the wire is to go into one hole at a time. Once the wire is treaded through one hole, pull it down next to the first button you put on the wreath.


While holding the previous buttons in one hand, thread the wire through another hole on the button. Pull the wire tight. This may require using a pliers to get the wire all the way through.


Keep threading on buttons one at a time. I like to do one on one side and then on the opposite side, but you can do it however you like. With the coat buttons, I like to put the buttons on either side of it really close together to sort of chain it in there and keep it from spinning around.


Once you get enough buttons on the wire to get a shape you like, simply twist the two ends of the wire together. I use the leftover wire to make a small loop and attach a ribbon hanger to it.

Here are some other ornament tutorials I've found that I liked:
Japanese Inspired Embroidered Ornaments
Circle Folded Ornament
Microwave Salt Dough Ornaments

Hope you enjoy!
Happy Crafting!

Monday, November 17, 2008

Blog meets Etsy


I am starting a new promotion in my Etsy store next week. I am adding Christmas related stock, as well as great gift items. Each day starting next week, I will name one item a day a "Featured Gift of the Day" The featured item will be discounted for that day only. As a part of that promotion, I will be making an entry here each day discussing what techniques I used to make the item, trials and tribulations in that technique and other interesting tidbits of information. Check back next week to learn about these great gift items!
Happy Crafting!

Tuesday, November 11, 2008

Yes, Virginia, I can sew a zipper!

I have always wanted to figure out how to sew zippers in things. I never thought I would be able to. But, today is a new day! I followed a fellow craftsters tutorial:


I was amazed at how relatively easy it was! I, of course, got ahead of myself a few times, and had to unpick seams and resew, but I am very pleased with the final product. Here it is:

I used a vintage handkerchief I found at a thrift store for the outside fabric. It had these three cute ships embroidered on it.


I used a blue cotton for the inside lining.


And here's a close-up of the zipper:

Never be afraid to try new things! I love the results of this (even if there was a bit of swearing involved in the making)! ;) It turned our really cute. Now I must make more. I have oodles of vintage hankies just waiting to become cosmetic pouches!

Happy Crafting!

Monday, November 10, 2008

Despite Myself

So, despite last week's post about using up my stash, I went shopping this weekend. I visited my sister-in-law who lives near a much bigger town. Of course, we went to Crafts Direct. That store is amazing! I ended up spending way more than I should have! I got some really cute stuff for pretty cheap, as they were having great sales on everything. Oh well. The good part is that after a day of shopping, we went back to sister-in-law's and crafted. So I did get some new jewelry made up. I also finished my needle-felted lion. I am undecided on how well that came out. I will post pics later today to show some of my booty and new pieces.

Thursday, November 6, 2008

Crafts supplies came in!

I live in small town by the name of Redwood Falls. We just moved here two months ago. Outside of a regular Walmart (that's right regular, not super) and a small downtown store that sells mostly scrapbooking stuff, there is not a craft store in town. The nearest town with craft stores is about 45 minutes away. I have recently rediscovered how many wonderful craft supplies you can get over the Internet. The only problem is you have to wait to get them in the mail! I have gotten so used to the instant gratification of buying supplies and then running right home to try them out! Now I wait, not so patiently, for my supplies to come in the mail. This means I don't get to make new exciting things as much, and I don't get as many things up in my Etsy store. However, I have decided after a three week Internet ordering spree that maybe I shouldn't order anything new, but instead use what I have (which is mountains of stuff!) I guess maybe that's a good lesson for us all. Today I finally got some great beads I have been waiting for. Tonight, I craft!

Here's some of the stores I have ordered from online recently:

Ye Old Supply Shop: http://www.etsy.com/shop.php?user_id=5552210

Dime Store Emporium http://www.etsy.com/shop.php?user_id=5852215

Amazon.Com http://www.amazon.com/

Happy Crafting!

Wednesday, November 5, 2008

So....due to watching election results last night and the fact that my internet was not working, I did not post. But I am now posting my progress on needle felting. I haven't progressed very far, but so far it seems to be working out okay. I only managed to stab myself with a needle once!
Here's my needle tool:


I started with some loose wool like this:


Then I poked and poked until I had a ball. (sorry no pics of this!) I did the same with a smaller amount of wool until I had two balls. Then I poked the two balls together. This is of course where I poked my finger. It hurt like a son of a gun! The result is this:

I am attempting to make a small lion. What I have right now looks somewhat like a cross between a chick and a dandelion. Hopefully he'll look better with a mane and face. (I seriously have my doubts about how this is going to turn out, but I'll have to see what happens. I am in the middle of crafting for two swaps on Craftster right now as well, so who knows. I was hoping to get this one done for one of the swaps, but I'll reserve judgment until he's finished! ;) Happy Crafting!

Monday, November 3, 2008

I have a blog!

I never thought myself to be a blogger, but here I am. I guess I finally gave in to it all. ;) This blog is primarily about my adventures in crafts and my attempts to try new crafts. These attempts haven't always gone well in the past, but hopefully others can learn from my mistakes. Woot! I just got a new craft supply in the mail this noon. It's a holder for needle felting needles. For those of you unsure what that is, here's a pic:

Image courtesy of www.woolycomforts.com
Mine is only a four needle, but you get the idea. I have never done 3-D needle sculptures. So, the project for tonight is to try! I'll post progress of how it goes tomorrow. Happy Crafting!

LinkWithin

Blog Widget by LinkWithin