Showing posts with label projects. Show all posts

Tuesday, August 16, 2011

Under $25 Makeover: Faux Glass Etching

This week's Under $25 Makeover room is my kitchen. This week, I'm showing you an idea I had awhile ago for votive cups. I've always loved the look of glass etching and I always set out to buy the cream to make something. But something (usually price) always stops me from getting it. Then I got a cricut. And with it came an idea. What if I cut out words using clear contact paper and applied it to something. Would it look like glass etching? You tell me what you think:


I think it looks fabulous. I used blue glasses that I got from Ikea for $2.00 a piece. Here's a close up so you can really see it:


Okay, so it's a little hard to see in pictures, but the effect in person is exactly like I wanted. In case you couldn't tell, they say "Live, Laugh, Love" An entire giant roll of contact paper cost under $5.00. I used only a tiny amount, so the project cost me around $7.00 or so. Here's where I used them in the kitchen:


That's all you get till tomorrow!

Happy Crafting!

*Shared at:
Todays Creative Blog

Friday, August 5, 2011

Under $25 Makeover: Guest Room Details

The details of any makeover can be what truly makes the room. So today, before you share your links, I'm going to share some of the details of the guest room/office.

First, I promised some details about the small dresser next to the bed. Here's a side by side of one drawer sanded and one not.


Did I mention that the drawers are made from these?


Dynamite crates! Awesome.

Some other details in the room include a vintage ceramic lamp for the tiny nightstand.


A memo board made out of a vintage tin tray.


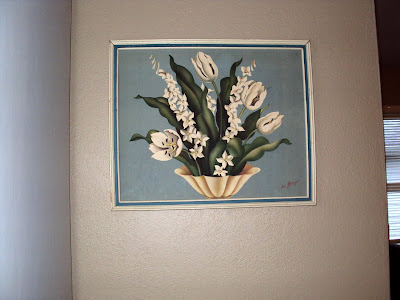
And finally, another small project I did was to paint the frame of this vintage print. The eclectic art wall needed some more color and painting the frame was a simple solution for that.


Now for the details of the linky party. You can share your links to any posts for a inexpensive project you've done. It doesn't have to be a new project, just thrifty! And please if you do share, check out others' links while your here. Also, don't be afraid to grab a Under $25 Makeover button on the left sidebar.

*Don't forget that at the end of August, everyone who's joined an "Under $25 Makeover" linky party will be entered into a random drawing for a prize package. I will be announcing said prize package next week.**

Happy Crafting!

Wednesday, August 3, 2011

Under $25 Makeover: Guest Room After

It's time to reveal the after on the guest room/office. I have the semi bad habit of thinking that every blank wall needs something, but in the case of the short wall opposite the door, I think this artwork does the trick. It's a vintage still life that I bought at an auction ages ago. Love!!


Here's the view of the bed, dresser, and bookcase.

The color inspiration for the room came from the bedspread. Ironically, the new quilt was almost the entire budget. It cost $19 and is from the Better Homes and Gardens line at Walmart. I've always wanted to do a room with bright colors. I decided to keep the walls a neutral light brown color (they were already painted that way when we moved in) and just use all the bright colors for accents. I originally was thinking I would make my own quilt for this room, finding one for $19 was just way cheaper than buying all the fabric to make one. Incidentally, the bed skirt is an old curtain I had bought several years ago a a thrift store.

If you look at the before pics of the dresser, it was very dark 70's green. I sanded the drawers and unearthed a lovely shade of bright green.


I like the two-toned effect. (*To see this better please check out Friday's detail post)

Here's the bookcase and the sewing machine (hidden it it's cabinet.). The bookcase can be seen up close and personal here.
Link
Here's a view of the desk and eclectic wall of fun.

I cleaned off the desk and organized everything in the room. You can also see the Cricut and the printer here.

Here's a closer shot of the eclectic wall.


I do have one small blank spot that I need to find something to fill. Any ideas?

I also did one small Cricut project in this room. I put a cute saying above the closet.


Yea!!!! That's my new room for under $25! I already mentioned I spent $19 on the quilt. I redid the dresser with just some elbow grease. I updated the bookcase for free with on hand supplies.
I added art to the wall I all ready had. The only other thing I spent money on was the vinyl for the wall words. I spent $3 on that. Therefore, the grand total for this room is $21!

Have I started to inspire you yet? I will go over a few of the finer details in Friday's post. Then you can join in the fun with a linky party at the end of said post.

Happy Crafting!

Tuesday, August 2, 2011

Under $25 Makeover: Bookcase Project

So I'm getting started on the Under $25 Makeover a day late and a dollar short! ;) Nevertheless, I promised a project for each week, and here's the first one. This week I am redoing my guest bedroom/office. In that room, I have one of those plain boring compressed wood bookcases we all had in college. It's laminate of course, so painting can be a pain. To save myself some heartache and time, I decided to just cover the back of the bookcase with something. I've seen this done several places before, the most recent being the Nate Berkus show.

So without further ado, here's the before:

I wanted to do something bright, but use supplies I already had on hand. I thought about using paper, but I didn't have enough of the same paper to do the whole shelf, so I decided to use fabric. I dug through my fabric stash and came across some great bright pink burlap I had picked up last year. It was perfect. I wanted to attach it to the back in such a way that I could remove it if I wanted to. That way if I got tired of the pink, I could change it up with a different fabric. I used 3M wall strips at the top corners and sticky backed Velcro dots. Here's what that looks like:


Once I had the top secured, I put the top shelf back in and the fabric was further secured.

I continued to use the Velcro dots at the top of each new shelf until I got to the third one. Then I hit a snag when I realized that shelf didn't come out as it was nailed in. I had to decide whether to leave the extra fabric and hide the bottom shelves or cut the fabric and not put any fabric behind the bottom two shelves. Before the decision:

In the end, I decided to cut the burlap and used three Velcro dots to secure it to the bottom of the third shelf.

Here's the finished project:

I did some rearranging, decided to get rid of some books, and filled the bottom shelf with two baskets that can hide junk. I also did a nice arrangement for the top of the bookcase using stuff I had around the house and some hydrangeas from my garden.


My hydrangeas are in full bloom, so look to see those in about every room in my house during this makeover! Well, that's my simple project for this week. All in all, the cost was free since I used stuff I already had in my stash. But even if you had to purchase supplies, the whole project would cost between $5-$10 depending on the fabric or paper used. I think this pink does a nice job of brightening up an otherwise dark corner. Look for the complete room makeover tomorrow. And don't forget, on Friday you can add your inexpensive project to the linky party!

Happy Crafting!

Friday, July 16, 2010

Funky Find Friday: Chairs

Today's Funky Find Friday is all about chairs! I thought I would show you some great chair redo's that would be easy for even the most beginner DIYer to do.
Found a chair that doesn't have a seat? That's no problem! Just weave a seat using webbing. Get the instructions here.

A fresh coat of bright paint and a rub on make this chair pop! Find it here.


Have several old chairs you're not sure what to do with? Put them together and make a bench. How-to here.


Plain modern chairs can be a bit boring. Add some scrapbooking paper to the back for a color punch. Found here.

Hope you find these chairs inspiring!

Happy Crafting!

Tuesday, March 30, 2010

Newest Creation: Vintage Tin Memo Board

I've had a stack of vintage tin trays forever. I've been meaning to do neat things with them. Finally, I took one and transformed it. But not too much. I decided to keep it simple on this one and make a magnetic memo board. I loved the design on this nautical themed tin, so I decided to go for it. Here's the end result:

I love the anchor detail on this. I had some cotton rope in my stash (originally picked up in the fabric notions section of walmart). Looks are a little deceiving on this one. I put a hole in each side of the tin using a nail and hammer. Then I used wire to make a little hanger to thread the rope through on the back. I covered the wire on the front of the tin with cute little rope knots. The knots are just hot glued on.

I took my fabric button kit like this one:and some blue and white ticking fabric I had and made buttons. Then I cut the back button part off and stuck them to magnets. Ta Da! Now I have a set of matching magnets. Here's the board at work:

So, what do you think? I love the way this turned out. I need to do this to more of my tin trays! There are a few that are plain silver that I'm thinking of painting with chalkboard paint in the middle. Wouldn't that be great?

Happy Crafting!

*Shared over at:
Do it Yourself Day at A Soft Place to Land


Show and Tell Green

Thursday, February 4, 2010

50 Projects in 2010

So, I am pretty addicted to the site known as Craftster.org. It's a great community of crafters who post on variuos boards about the projects they do. It also has a great swap system, where crafters from around the world can exchange crafted goods. I am frequently involved in swap or two over there.

Towards the end of last year, I became busy with this blog and Twitter and Etsy and didn't post much over on Craftster. This last couple of weeks, I've found myself sucked back into all the great stuff that's available over there.

One of those things is a craft-along board under the topic 50 projects in 2010. Check it out here. The premise is simple. You make a list of 50 projects that you want to complete by the end of the year. You post your list and then occasionally post your project on completing that list. I don't have a full 50 items on my list yet. (I'm leaving room to add projects throughout the year.) but here's what I have so far:

Stuff in bold is done, Stuff in red is a work in progress
1. Crib sheets (3-4 sets)
2. Baby blanket/quilt for my little one
3. Baby quilt for friend
4. Shirt for myself (already have pattern and fabric)
5. Dress for myself (already have pattern and fabric)
6. 3D blocks for baby out of fabric
7. Magnets for office board
8. Apron for me
9. Pillows (at lease 5-10 to sell)
10. Knit something (been meaning to learn this for years)
11. Finish wedding scrapbook (a year and a half later...)
12. Embroider something (need to learn this too.)
13. Sew a plushie of some kind
14. Infinity dress for myself
15. Recover dining room chairs
16. Recover club chairs from living room?
17. Window hanging for nursury
18. Memo/message board with shutters
19. crochet baby blanket
20. Make at least 10 gifts (birthday, holiday, whatever)
21. T-shirt quilt with old school shirts
22. Finish crocheting Mom's large doily (started this several years ago)
23. Felt some soap
24. Try wet felting something (scarf maybe?)
25. Needle felt a 3D object
26. Carve a rubber stamp (been wanting to try this)
27. Redesign logos for all of my stuff (blog, Etsy, etc)
28. Make some Rapunzel scarves with yarn stash (at least 2)
29. Make book page wreath
30. Learn to crochet with wire (jewelry)
31. Finally finish organizing craft room
32. Decorate onsies for the baby

So far that's a pretty good list. I have two projects done, so my total for the year so far is 2/50 (at least as far as the list goes!). I will be posting pics of the finished items later today (and maybe a sneak peek at the wip).

I thought I would share my list here as well to encourage those of you out here in blogland to join in the fun! Come up with your own list of projects to finish throughout the year. It doesn't have to be 50. You can participate in this craft-along by joining in on the fun over at Craftster, or simply put your list on your blog. Let me know if you're joining the fun. If enough people decided to join in, we may be able to make this into a linky party!

Happy Crafting!

Thursday, January 21, 2010

Quickie Project of the Week: Baby Stuff!

So this week's quickie project of the week is actually several small projects all to do with baby stuff! I finally got the nesting bug and I want to start making stuff for the baby. Part of the reason I haven't already is we are not finding out if it's a boy or girl until the big day. I finally decided I'm just going to make cute stuff anyway and if it's not for the right gender, I'll either give it away or keep it for future little ones. On to the projects!

First, I wanted to do some decorated onesies. I had bought the most adorable iron-on transfers made by Plaid on clearance for $1 per set of 2 transfers. I couldn't pass that up! I made two last night:

I just ironed the images on following the instructions that came with the transfers. (Set iron to highest cotton setting, no steam press firmly on hard surface for 60-80 seconds, let transfer paper cool, peel off paper)

Didn't they turn out super cute? I love the squirrel one! I was planning on sewing ruffles on the butt of that one using pink and white gingham, but my sewing machine broke last night. *sigh* Hubby is supposed to "fix it" tonight. I think it's beyond repair this time, but we'll see.


Another quick easy project I did last night was a picture for the baby's room. If it's a girl, I'm now leaning toward a grey, white and yellow color scheme for the room. Here's what I came up with:


I took a blank canvas from walmart (I think this one is 8 x 8 inches, but I'm not sure). I painted it a dark grey with acrylic paint (black and white mixed together). After it dried, I took some cutouts I made on my Mom's cricut last weekend. I used ModPodge and spread it over the back of each cutout with a paintbrush. I laid the cutouts where I wanted them and pressed them down fairly hard. I let them dry for a bit (around 10 minutes or so) before coating the whole canvas with another layer of ModPodge. TaDa! In less than 45 minutes or so, I had a super cute picture that will either hang in the baby's room, or get given to someone else!

Next time I make one of these, I'll try to remember to take in progress pics! I have to make at least one more now, in my "boy" color scheme of red, black, and white! ;) If I keep this up, I'm going to have double of everything!

Happy Crafting!

Organizational Rack (formerly known as spice rack)

I've been trying (slowly) to motivate myself to get cracking on one of my resolutions to organize more (or better). I completed a small project the other day that I think will help in that quest. I found this spice rack at the thrift store for $2.


It didn't have the containers in it anymore. Fortunately, I've been storing up prescription bottles from my pre-natal vitamins. They seem to fit in there nicely. The goal is to store all the various craft supply bits and bobs that are small but I don't know where to put them.

I painted the whole rack with turquoise acrylic paint. Then I distressed it with sandpaper. Then I coated the whole thing with burnt sienna acrylic paint and wiped it off while it was still wet. Here's the results:

I like it! My next task was to gather up some crafting supplies and put it in the bottles. I wasn't sure at first how well I could see what was in the bottles. So my next idea was to put a bit of whatever was in the bottle on the front of the cap so I knew what was in there. Here's one side done:


This side has various random embellishments in it. The other side has my glass glitter:

(You can't really tell, but the first bottle is white glitter.) Well, that's all the farther I've gotten. I ran out of bottles for now. But each month, a new one will be added. If I find any other containers that work, I'll be set! What do you think? Have you come up with a clever idea for storage and/or organization? Please share!

Happy Crafting!

Wednesday, September 16, 2009

More Junk!

Continuing with the theme of this week, which seems to be junk and junking, I thought I would show you some garage sale finds. This last weekend, my city held city-wide garage sales. Usually, I find a few things at these, but not too much. This weekend was different. I found the mother of all sales that was mostly antiques and other "junk." I'm actually kicking myself for not going back there and buying more.

Furniture wise, I found this cute wicker hamper and this little green stool.

I love this adorable lamp. I just have to rewire it and paint the base. I'm leaving the vintage lampshade just the way it is!

I found this chenille bedspread I plan on making pillows with.

Some vintage sheet music and an awesome antique cheese grater I plan on hanging on my kitchen wall (Why didn't I get more of these!).

Not to mention an entire box of these shutters for free!!
Not all of this was found at the same sale, but most of it was from that awesome one. I'm really regretting not buying that cute wooden bench for 5 bucks and more cheese graters, sheet music, etc. I'm hoping Junk Bonanza this weekend will make up for it! ;) I'll show you transformations when I actually get to work on these great finds (which probably won't be soon.) *sigh*


Happy Crafting!


LinkWithin

Blog Widget by LinkWithin