Showing posts with label sewing. Show all posts

Saturday, August 13, 2011

My new obsession

I finished a project yesterday that I am obsessed with. It just turned out so awesome I can't get over it.

How cute is that pillow? I seriously love it. When I saw this pink and white hounds-tooth in the remnant cart at Joanne's Fabrics I knew it was begging to be made into a pillow. Then I thought wouldn't this look great with a screen printed silhouette? And I was right. It's perfect! *Sigh* I love when a project turns out exactly how you envisioned it don't you? I have to give a shout out to Karen over at Graphics Fairy. I used the silhouette from here.

Happy Crafting!

Monday, August 8, 2011

Under $25 Makeover: Toy Box Project

My room for this week's makeover is my living room. I literally spent almost nothing in this makeover, but we'll get to that on Wednesday. The project I am sharing for this room is an ottoman with toy storage. I had a super dinky footstool for the couch, and it wasn't working. On top of that, I needed a place to store all of my daughter's toys. Enter the $2.5o auction find:


At first I was just going to slipcover it as is, but the old contact paper covering was giving off some kind of staining oil. So, I started to rip it off thinking maybe I'd refinish the wood underneath. (I have to mention here that ripping it off involved pulling out hundreds of tiny little nails.) This is what I found:


Not very attractive looking. It was then that I decided to go back to the original plan of slip covering, but I also decided it needed extra padding. So I used the staple gun to attach a layer of quilting batting over the whole thing.


I used some ecru colored heavier fabric I had laying around and sewed a rectangle for the bottom with elastic that fits just under the lid. Then I sewed a rectangle for the top and did corners like you would a bed sheet and fitted it with elastic. Here's the final result:


Here's a close up of the lace detail on the bottom:


I think it still needs a little tweaking. I have to put some sort of feet or wheels on it to make it easier to move. Other than that the only thing I bought for this project what the actual box itself. Not a bad $2.50 investment if I do say so myself!

Happy Crafting!


Tuesday, January 25, 2011

Cure for the Winter Blues: Hide the Clutter!

In the quest to cure my winter blues, I need to organize....eventually. This post is more about hiding the mess rather than cleaning it. It's not really a mess per se, it's the bedroom closet. Since we moved in in June, there are no doors on the master bedroom closet. It's been bugging my for awhile. I don't really have the funds to buy doors right now, plus I've been thinking it would be softer to do curtains. As I said, funds are low, so I'm making curtains out of what I have in my stash.

My stash so happens to include a canvas drop cloth, an old sheet, some grosgrain ribbon and old lace.

Our bedroom is done in blue and yellow. The drop cloth was an odd size, skinny but long. In this case that worked out well, I just folded it in half and cut. That way all the edges were already finished except the top. I folded over about 2 inches on the top to make a rod pocket and sewed!

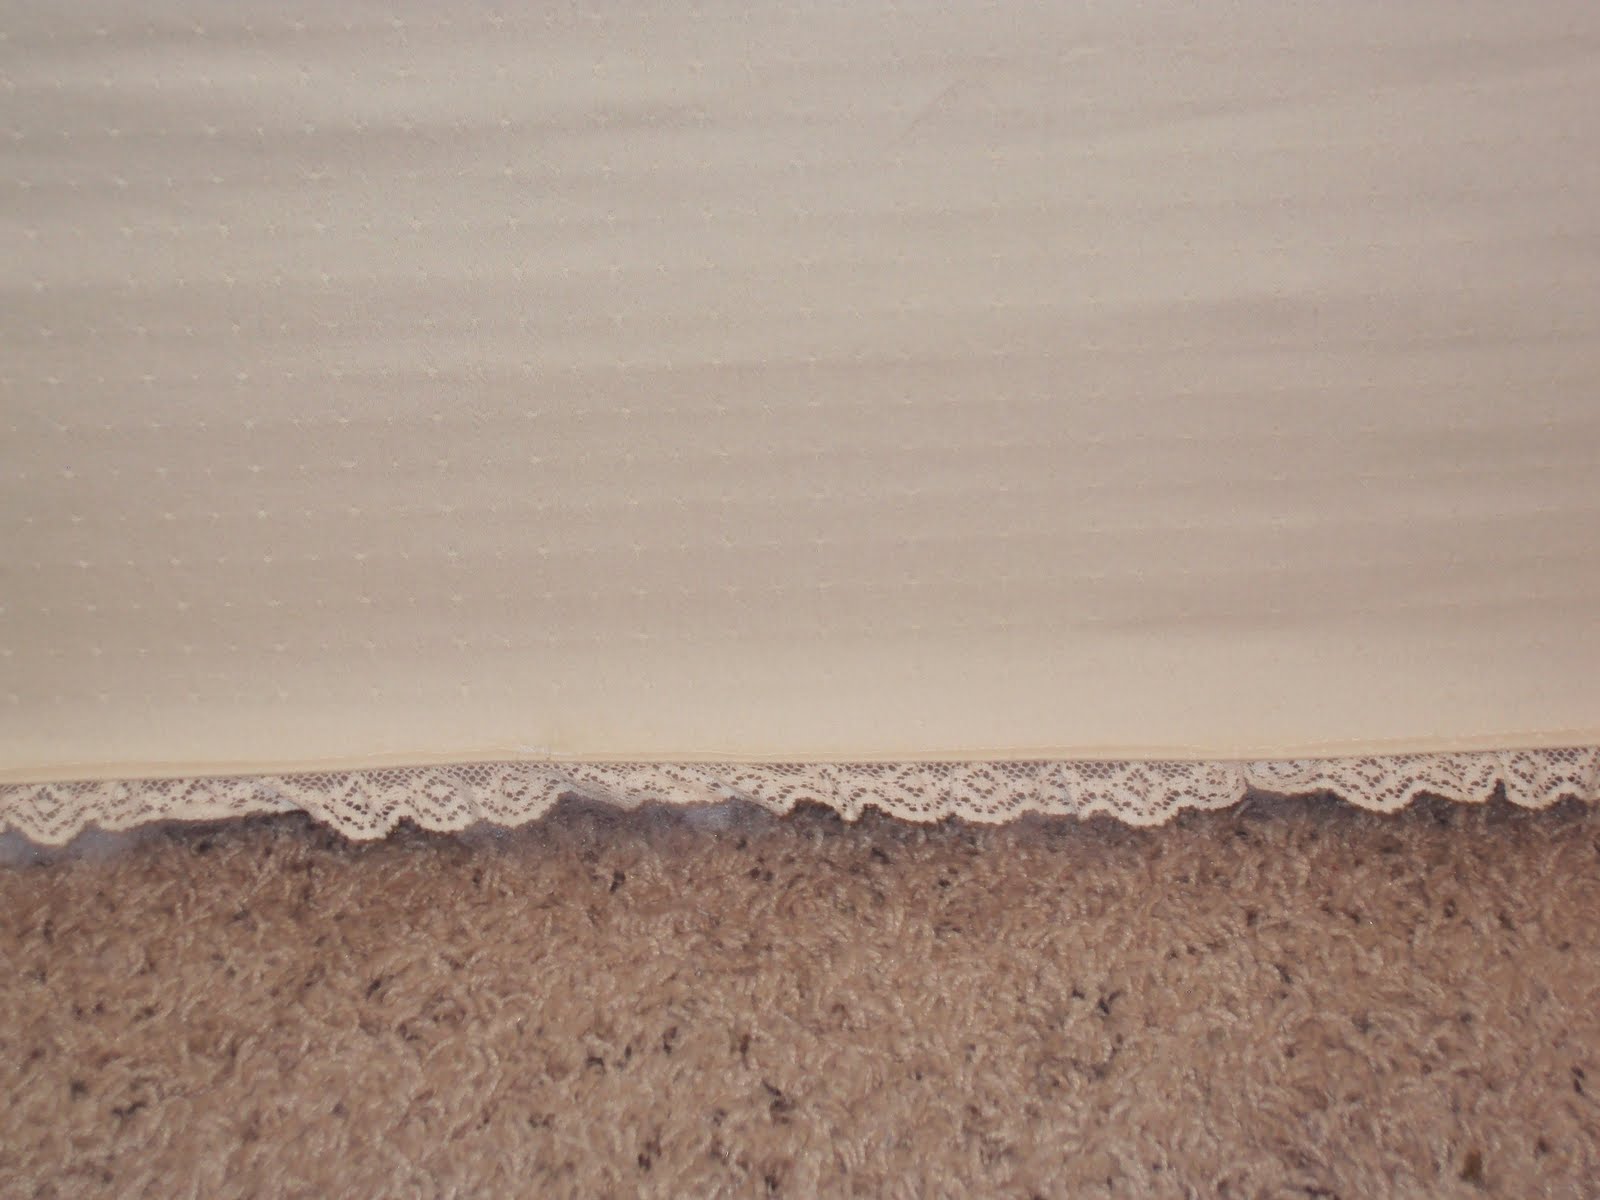
I then accented the bottom with a strip of the sheet about 5 inches wide. At the top of the strip, I sewed the lace and grosgrain ribbon that I had gathered to ruffle slightly. This sounds a lot more complicated than it really is, I just sewed straight lines!

When it came to hanging the curtains, I didn't have a rod, and didn't want to spend money on one. So, what did I have in my stash to make it work? Picture hanging wire, two eye hooks and a nail! I just put an eye hook in each end of the doorway and a nail in the middle. Here's one end of the closet opening:

I just had to string the curtains on before I put up the other end of the wire. It's just twisted around the eye hooks, so I can untwist it to take them down to wash if I want.

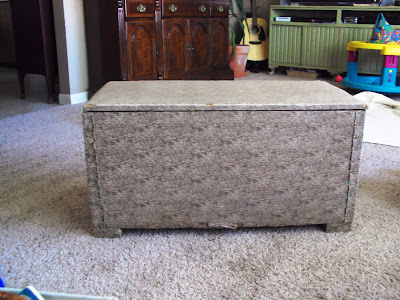
Here's the finished project:

And here's a closeup of the bottom:


I absolutely love the result! I don't have to look at clothes and shoes if I don't want to, and the curtains slid open and shut great on the picture hanging wire. It makes for a much cleaner looking bedroom. I can already feel those blues sliding away. Just a bit. Check back later today for another great blues buster!

Happy Crafting!

Wednesday, June 9, 2010

Great Baby (Stuff) Making Tutorials

I didn't mean that title exactly as it sounds. Long before I had our little pumpkin, I started looking for tutorials on making crafts for babies. I ended up using quite a few and have quite a few more stored up and ready to make (as soon as I find and unpack my crafting supplies). I thought I would share some of my favorite ones.

Crib sheets seem like such a racket. They run anywhere from $7-$10 in the store (and that's for the cheap ones!) It's much less expensive to purchase 2 yards of fabric and sew them yourself. This tutorial from Made makes it so simple, even a novice sewer can make them! I made three different sheets from soft cotton flannel.


This next one is definately on my to do list: tights for the baby. I found a tutorial over on Made by Rae that I would love to try!


If you've been around the craft blog world at all, you've seen dozens of tutorials on how to make baby legs. This one from Everything your Momma Made & More seems fairly simple. This one is still on my to-do list.

Here's a great idea: using fabric to make "wallpaper" to decorate the baby's room. This is a good alternative to expensive vinyl graphics. Infarrantly Creative shows you how to do this here.

The best part? When you get tired of it, You just spray the wall lightly with water and it peels right off!

There are many different tutorials for customizing onesies out there. One of my favorites is this one from Not So Idle Hands. The reason I like this one so much is it uses a "cheat" to do screen printing. I've wanted to screen print for a really long time, but getting started is so expensive. This method uses inexpensive materials that every one can find.

There's also a tutorial for baby legs there.

One last tutorial: a rag quilt. I made one of these in my boy color scheme. Now of course, I didn't have a boy, but I will use as a gift for the next time I have to give a boy baby gift. Here's a good, easy to follow tutorial for one on Oopsey Daisy.There are of course, many more tutorials out there for making baby stuff. These are just a few that I've found and liked. Have any great baby (stuff) making tutorials? ;) Please share in the comments.

Happy Crafting!

Friday, February 12, 2010

Baby Blanket #1 Finally Finished!

Okay, so I've been promising to show you this for awhile now and I'm just getting to it. Sorry! I can only hope that showing you now makes up for it. I mentioned awhile ago that I was working on a blanket in my boy color scheme (black, red and white). I struggled a bit with the last seam on it, but I finally finished it today. It's a rag quilt. I loosely (very) followed a tutorial like this. (I can't find the exact one I used anymore.) Here's the final result:

Skull rag quilt front

(I just realized how narrow it looks in this pic. It is not that narrow, just my ugly camera skill rearing its head again!) I love how this turned out! I didn't follow the tutorial exactly in that I just used one large piece of batting in the middle and one piece of red minky for the back. I tacked the batting to the front piece before sewing on the back. Here's what the back looks like:

Skull rag quilt back

Here's a close-up of the front so you can see the "rag" seams and the fabric:

Skull rag quilt closeup

All the squares are cotton flannel. I used natural cotton batting for the middle and minky (blend) for the back. Once I was done sewing everything together, I washed and dried it to get the rag look on the seams. I kinda wish I would've sewn it together with individual squares on the back as well, but live and learn I guess.

This turned out so cute! I can't wait to get started on my next project! (Again, going overboard and getting ahead of myself here!) I bought this Michael Miller panel:

Michael Miller panel

It's from the "At First Sight" line. I'm not sure if I'm going to do another blanket, or something else entirely with it. If I do make a blanket, it's just going to be a lightweight one without any lining/batting in the middle. What do you think I should use it for?

Happy Crafting!

Thursday, February 4, 2010

More Baby Projects

I thought I would show you some of the stuff from my 50 project list. First I sewed a baby blanket for my friend.

The front is made with four squares of blue chenille (recycled from an old bedspread) and a chocolate brown velvet. I used satin binding around the whole thing. (babies love the texture of this!)

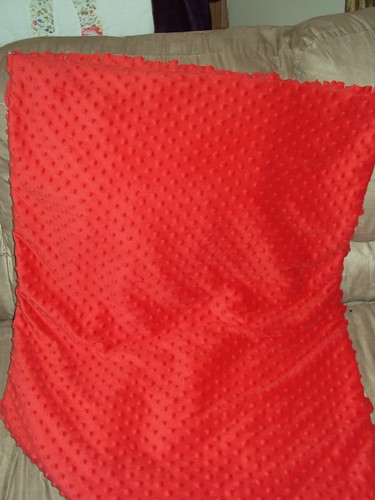
Back with just chenille:

I also made a boatload of onesies for my little one. Whether I have a boy or girl, I have onesies I can keep and some I can give away as gifts.

Remember this one:

Well, Hubby fixed my sewing machine (Hurray!!) so I was able to add the ruffles to the butt:

How cute is that?

I added a bow to this one:


I appliqued a few with felt. Tow truck:

Cowboy boot:


This next one, I'll probably add something else to, but I thought the iron on was too cute to pass up:

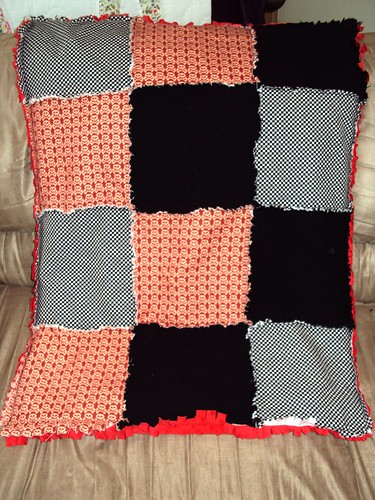
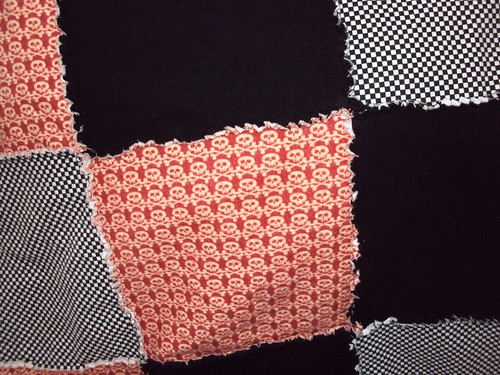
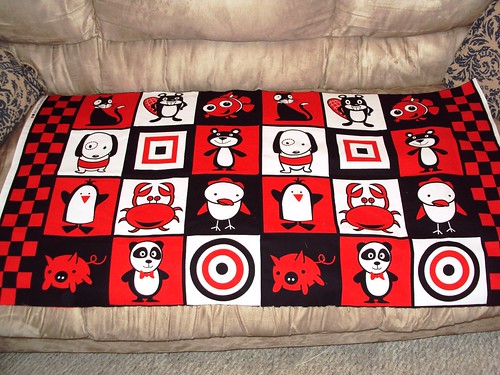
Whew! Now that I've shared these projects with you, I don't feel like such a slacker. Technically, this counts as 2 of my 50 projects so far. I'd better get cracking if I want to get all 50 acomplished by the end of the year! I should have another one of those projects done tonight. I'm making a rag quilt for the baby and I only have to sew on the back and I'm done with that one.

Here's the dilema on that: We are not finding out what we are having. I have two very distinct color choices as far as the nursery goes: boy = red, black and white and girl = gray and yellow. So, I'm getting ahead of myself by doing anything for the baby's room this far in advance. I decided to make a few things to tide myself over and whatever I don't end up needing will either get given away as gifts or sold. (The current WIP is in the boy color scheme of red, black and white.) Hopefully, I'll have pics of that to share with you tomorrow along with a link to a tutorial and additional tips on how I made mine.

Happy Crafting!

Thursday, December 10, 2009

New Christmas Decorations

The last couple of days I've been working on Christmas decorations. First, I needed a tree skirt. I had bought some cute fabric when it was on clearance last year. I made a square-shaped skirt with patterned fabric on the top, batting in the middle and solid colored fabric on the bottom. I sewed quilt binding around the whole thing. Here's some really bad pics of the whole she-bang (still using camera with no flash, and I took pics at night):

Here's a close-up that shows the back side as well: The fabric has Santas, reindeer and sleighs all over it with the lyrics of jingle bells.

Tree without a skirt: boring! And look at all the cords showing!


Tree with skirt:
Much better! My skirt is a little big for the space, but oh well.

The next project I did is for the outside steps. I found this basket at the thrift store with all the goodies inside it for only $5!

Look at all the good stuff inside!

Red berry picks, fake sugared fruit, and even some red Christmas balls! I ended up only reusing the berry picks for this project, but I did use the sugared fruit elsewhere which I'll show you later.

I took a cheap fake garland from Walmart and coiled it in the basket. Then I added two nicer evergreen picks in the middle to add some height (I got those from Joanne's when they were 50% off) Finally, I stuck in the berry picks for color. Here's what it looks like now:

Here's a close-up of the inside of the basket:

One of the nice evergreen picks has pine cones on it, and the other has crystal snow. I thought together they were a nice balance.

Here's the basket on it's stool on the front steps:

Well, what do you think? Not a bad looking basket for less than $10 and 10 minutes work! Plus, it's not really too Christmassy to leave out all winter long. (Or at least until my hubby gets tired of shoveling around it!) ;)
Got any small projects you've finished lately?
Happy Crafting!
*sharing this at:

Thursday, December 3, 2009

I Bit the Burlap Bullet

So, everyone in the online crafting world has been going nuts over burlap. I've refrained from doing so for quite some time...but alas, Christmas got the better of me. My mom gave me a huge pile of pillow forms last time I was home. I also acquired some really cute felt shapes from various places like the Dollar Tree and Target. The fabric that brought all these things together nicely was (you guessed it!) burlap. These were super simple to make, and I have to admit, they turned out great!
Some (mis) guidance:

For each pillow, I just measured one side of the pillow form (from side seam to side seam) and added 1/2 inch total (for 1/4 seam allowance on each side) all the way around. Then I cut one square for the front using that measurement. (Ex. the pillow form measures 15 inches, so I cut a square 15 1/2 x 15 1/2 inches.)

For the back, I did an envelope style so I could change out the cover if I wanted. For these pieces, I kinda eyeballed it, but it basically ended up being the same measurements as the front plus two inches or so on one side only. (in our example, this would be 15 1/2 inches tall by 17 1/2 inches wide.) Then I cut this rectangle in half, starting on one of the wider sides (17 1/2 inches) Then I folded under a 1/4 inch on each half (where you just cut the two apart) and sewed a seam to finish the edges.

Next, I pinned the front piece and the back pieces right sides together and sewed them together on all sides. (Note: when you pin the back pieces on, they will overlap each other in the middle of the pillow. This is how you stuff in your pillow form and hide it.)

Once sewn, turn the pillow case right side out. Make sure to get in those corners good! Stuff in your pillow form. Finally, I used fabric glue to attach the felt embellishments. I thought about hand sewing them, but I didn't want any stitches to show (plus I'm lazy!). I put the glue directly on the felt, positioned it on my pillow and pushed the felt down really hard. Then I pinned it and left the pins in for a couple of hours.

Did I confuse you with this pictureless tutorial yet? If I did, please let me know. I am planning on doing some more of these soon, so if need be I can take pics to stick in here as I go. But for now, you'll have to settle for pics of more completed pillows:


The one below is my favorite. I used red burlap (you should also note I did fringed edges on this one by not turning it inside out and unraveling the edges up to the seam). *squee!* I think I'm addicted!


Here's a picture of the back of one so you can see what I mean when I'm describing it:

I managed to get all three pillows done in a relatively short amount of time-probably about 2 1/2 hours or so, not including glue drying time. Also, I think this is the first sewing project ever where I didn't have to break out the seam ripper (knock on wood!). Which is good, considering I'm not sure the burlap wouldn't have started to unravel. These would make great gifts and are inexpensive, since I used recycled pillow forms and burlap is cheap. All the felt appliques were 2 for $1 at the Dollar Tree.

What have you done with burlap? Let us know in the comments!

Happy Crafting!

*Sharing this at:

the Inspired Room's Holiday Linky Friday

Today's Creative Blog: Get your Craft On

Homebody's Thrifty Gifty

Infarrantly Creative's Pennywise Presents

Wednesday, July 29, 2009

One man's trash...

My 7 yr. old niece asked me several weeks ago to "please sew my net back together." The net in question is a cute green butterfly net that lives at their lake cabin. The same lake cabin where she catches frogs, moths, worms, fish, and every other imaginable creature she can and then tries to keep them. Of course, being the good auntie that I am, I said I would fix it and bring it back to her next week. This was four weeks ago. She asked me again last week if I had fixed it yet. I had forgotten all about it. I forgot about it as soon as I got home again, too. I thought of it today only because hubby and I are going up to see our nieces and nephew tonight. I realized I better get cracking if I am to get this "sewn back together." So I pulled out my needle and thanked the lucky stars even though I don't embroider and I haven't cross stictched in years, I have embroidery floss. I pick green to match the net. (Although one of my other nieces (8 yr. old) would tell me that it doesn't match because it's not exactly the same shade of green.) So, I managed to get the net all sewn up over lunch break.

During these last few weeks, I thought about telling my niece I couldn't fix the net, and then buy her a new one. But I realized two things. First, that it wouldn't be the same to her. Second, that maybe it's good to teach kids that not everything needs to be thrown away the second it gets broken. That maybe things can be fixed or reused in a different purpose. It's never too early to teach "reduce, recycle, reuse." Especially if you're teaching it in a practical way that's easily understood by all ages.

Happy Crafting!

Monday, June 29, 2009

New Line: t-shirts!

Hi. I have been absent from here for way too long yet again! I am going to try and get better at this (I know, promises, promises!) and post more often. For today, I thought I would share some of the shirts I've been working on. I've been facinated by freezer paper stencils since first learning about them. Freezer paper makes great stencils because you can cut out a shape and then iron the paper shiny side down to the fabric. The paper will stick to the fabric and you can then paint or bleach the area without the paint running or lines blurring on you. The paper then peels right off when you're done, leaving you with clean lines! I've been experimenting with bleach rather than fabric paint because it last longer, doesn't crack in the wash, or fade after too many washings. Then I had a stroke of genius: Why not do a "reverse" stencil? Usually when you make a stencil, you get a big sheet of paper and cut out the middle parts. Then you use the outside paper for your stencil. Instead, I used the middle part and ironed it on to my fabric. Then I tied up sections of the shirt around the stencil like you would for tiedye. The result? See for yourself:


For bigger pictures, go to my Etsy store and check them out! For more information about using freezer paper stencils, post your question in the comment section or go to the Stenciling Board at Craftster.org!
Happy Crafting!


Tuesday, December 2, 2008

First Giveaway!!!

Okay, so I've seen some fun giveaways on blogs and decided to do one of my very own. For this first giveaway, I am giving away something that I made. I am giving away this lined zipper makeup bag.


It has a fun cotton blend orange and white striped fabric. The inside is solid orange cotton and the zipper is white.

Not only am I giving away the bag, but the winner will receive the bag stuffed with little surprise goodies. The surprise items may include jewelry, beads, vintage fabric, pictures, and any number of things from my craft supplies or store items. (Some of the goodies will be Holiday themed.) What do I have to do to enter and win this fabulous bag of goodies you might ask? Well, here's the details: starting today and until 5 pm on December 9, 2008, visit my Etsy store. Pick out your favorite item from my store and leave a comment telling me what it is here on the blog. I will draw from those who have posted comments and announce who the winner is on December 10th. That leaves you one week to enter. Don't delay!

Happy Crafting!

Wednesday, November 26, 2008

Featured Gift of the Day: Polka Dot Hobo Bag


Today's featured gift is a great brown and white polka dot hobo style bag. I really love this bag and had a hard time keeping it for myself! Both the outside and inside have brown and white cotton blend polka dot fabric. The outside of the handles are made with a rayon blend brown and white flower pattern. The inside of the handles have a soft brown faux suede.

For today's entry once again, I am not going to go into step by step details. Instead, I am going to give a word to the wise on fabric choice. I am really happy with how this purse finally turned out. HOWEVER, it was a pain to sew! Rayon blends and faux suede do not mix well, even if the final result is fabulous! So as a precautionary tale I would tell you to try sewing a few small swatches together to see how they work before starting a big project. And never forget that when sewing lightweight material to heavy material, fusible interfacing is your friend! Ironing interfacing onto your lightweight fabric helps this process immensely. But the most important tip is never be afraid to try new fabric combinations. I did struggle a bit with the rayon and suede, but the results were fantastic.

Happy Crafting!

p.s. as a totally unrelated matter, next week I will be hosting my first giveaway. This time I will be giving away my own stuff. Eventually I plan to give away other great products. More details to follow next week.

LinkWithin

Blog Widget by LinkWithin