Wednesday, September 30, 2009

Old Microwave Stand Redo

So I was a busy beaver last weekend. Not that I actually got any cleaning or baking done like I planned, but I got lots of other stuff done. ;) The project that took me most of the weekend was a rehab of an old microwave stand. I am trying to actually clean and organize my craft room (porch) so that all the jewelry stuff is together, all the paint, etc. This stand sits in my craft room and is great for doing projects on since it has a drop leaf on it. (My mom gave me this for free. Woot!)


Here's the before:


And one with the leaf up:


Pretty ugly, eh? I was originally going to paint it an off-white, distress it and antique it, but at Junk Bonanza (see posts here and here), I saw several pieces that had been painted turquoise and distressed and antiqued, so I decided to go for it.

First I removed the hardware from the drawers. Then I sanded the whole piece with a palm sander. Then I painted the whole thing with cheap but effective paint from Walmart (Color Place: I believe the color was just called turquoise, I'll check and get back to you).

Here's what it looked like with a coat of paint:


Whew, that's bright! But don't worry, I'm not done yet! I took a piece of sandpaper and hand-sanded all the edges so they looked like this:

Then I took a foam brush and brushed on a dark walnut stain we had leftover in the garage. I put on the stain in small sections and then wiped it in circular motions with a rag. I did this over the whole piece and then let it dry. I didn't like the way it looked (still too bright), so I decided to brush on another coat with a bristle brush and just work it into the wood with the brush alone. This worked much better! To show you the difference, I took a pic of two drawer fronts. The bottom one is the one done with a rag wipe, the top one is after I used a bristle brush. Huge difference!


You can also see I spray painted the hardware with a hammered bronze spray paint (Rustoleum brand). When I put on the second coat of stain, I did it right over the hardware too. I think it helped it look much more aged.


Here's the finished product:


(Ignore the still messy craft porch. That's the cleaning I didn't get to this weekend.)

I love the result! That walnut stain definitely darkened up the turquoise paint a lot!!! What do you guys think? The whole project cost around $4. The only thing I bought was the half gallon of paint and I only used about half the can. I'm thinking now I might have to paint my tall freestanding cupboard in the craft room the same color!


* I plan on posting this tomorrow over at Shabby Chic Cottage for Transformation Thursday.

*Also linking up over at Infarrantly Creative's Roadkill Rescue Party!


Happy Crafting!

Tuesday, September 29, 2009

Big Announcement

Okay, so I have a big announcement that I've been holding back for awhile now. I've alluded to it before in several posts. What is it you say? I'll give you a hint:


Figure it out yet? My hubby and I are expecting our first child in April of next year. It has been a little harder for me to fit in the crafting latley as I have been tired and a little sick. I'm hoping that I am better now for the most part (fingers crossed). Other than that, being preggers shouldn't slow down my crafting much (except the spraypainting inside!) I am pretty sure that it will, however, influence the type of crafts I do. In other words people, expect to see some baby crafts mixed in with the regular stuff. Can't wait to start making adorable onesies! :)

Happy Crafting!

*Image from TheGraphicsFairy.

Quickie Project of the Week: Reed Diffuser

First, I want to give you a quick heads up about two regular posts "Inspiration Tuesday" and "Funky Find Friday." I am still planning on doing these segements, but not every week. That being said, I am introducing a new weekly segment, "Quickie Project of the Week." This will be a once a week post that can come on any day of the week. It will highlight a quick and easy project you can do in half an hour or less.

This week's Quickie Project of the Week is a customized reed diffuser. These are all over the stores. You have a bottle of fragrance oil and put reeds in to draw the scent out into your room. These can run anywhere from $5 to much more in stores. But what if you have a pretty container you already like? You can pick your own container, your own scent, even different colored reeds if you want.
First, you need to find your supplies. I found a cute finger-tip vase at Walmart for $1. There were also numberous types of scented oils there in bottles for a couple of bucks a piece. I got a box of 10 replacement reeds at Target for a couple of bucks.
The supplies:


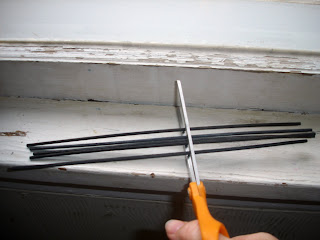
The reeds were really long for my container, so I cut them in half:

Then you just fill your container with a couple of inches of oil and put the reeds it. That's it! Now you have a reed diffuser that perfectly matches your decor and is filled with the scent of your choice!


The possibilities are endless! You can use any kind of water (or in this case oil!) tight container to do this. And for a few dollars, you can put a different one in every room of your house. It can be especially inexpensive if you use containers you already have. Plus, I only put 5 reeds cut in half in my container. That means I still have 5 short reeds and 5 long reeds left to use. I also have a lot of extra oil left to refill my container as needed.


I can't wait to make more of these for around the house. Plus, you could easily put together a bunch of these for gifts.

**Update: I was just at the Dollar General and even they have bottle of scented oil. All for $1 of course!***

Happy Crafting!

Wednesday, September 23, 2009

Inspiration Tuesay: A day late but with awesome junk!

I didn't end up posting my junky finds yesterday while trying to get the sun to peek out for better photos. No sun today either, so you'll have to settle for sub-part ones ( I know, but I'll try to make the sun come out tomorrow and retake them!) Anywho, I found lots of great stuff, all on the trinket sized side this time around.

I bought these adorable tin film canisters.


I plan on using vintage ephemera to alter a few of these. At least one of them I plan on turning into a pin cushion.

I found various bit of vintage silverware, all just begging to be made into jewelry.

I especially can't wait to turn the tea spoon into a locket pendant with stuff inside!

Vintage dominoes and mahjong tiles I plan on making jewelry out of also.

I'm not entirely certain, but those mahjong tiles may actually be made out of carved bone mounted onto bamboo.

Tiny cute perfume bottles I plan on altering with ephemera, jewels, and ribbons.


And finally, probably my favorite find was this antique silver hand mirror with my initial on it.

It's kinda hard to see, but there's a beautiful script E in the middle. Plus, the mirror itself is in great shape:


I had a blast at Junk Bonanza and would recommend it to anyone. There are several other flea/antique style markets coming up in the Twin Cities area to watch out for as well. I'll update this post with the info when I can find it in my mess! Also, I promise some finished crafts are coming soon! I am reorganizing my entire craft area right now, so it's hard to get at things.

Happy Crafting!

Monday, September 21, 2009

Junk Bonanza in Review

Junk Bonanza was awesome! There were three huge buildings of booths. Mom and I got there around 10:00 am and left at 5:00 pm. We were really rushing to see everything in the last building at the end of the show too! I do have some pics. They are not great ones because I forgot to bring my actual camera, so these are all from my cell phone. Today I'm going to highlight some of the cool booths and neat items I saw. I'll show you what I actually bought tomorrow.

Great display of camp items:


Awesome giant sign letters:


A pretty display of primitive white and silver items:


I love this vintage tin trunk that's been printed with names of streets and other landmarks from around the Minneapolis-St. Paul area.


Hall tree made out of an old door:

A random crowd shot also showing some cute pumpkins made out of chenille:


There was so much cute stuff that I'm kicking myself for not getting pics of. There were peace signs made out of vintage ceiling tin, vintage roller skates used as wine bottle displays, and lots of fabulous junky furniture. I'm already dreaming of next year!

Don't forget, tomorrow for Inspiration Tuesday I'm going to post the stuff I got and unveil all my fabulous plans for it!

Happy Crafting!

Friday, September 18, 2009

Funky Find Friday: Slightly Postponed

Becaue of all the excitement I plan on bringing you by going to Junk Bonanza tomorrow, I'm not going to post a Funky Find Friday today. But I will be taking loads of pics and posting them both here and on Twitter. I can't wait to see the junk (and go to Ikea)! Woot!

Wednesday, September 16, 2009

More Junk!

Continuing with the theme of this week, which seems to be junk and junking, I thought I would show you some garage sale finds. This last weekend, my city held city-wide garage sales. Usually, I find a few things at these, but not too much. This weekend was different. I found the mother of all sales that was mostly antiques and other "junk." I'm actually kicking myself for not going back there and buying more.

Furniture wise, I found this cute wicker hamper and this little green stool.

I love this adorable lamp. I just have to rewire it and paint the base. I'm leaving the vintage lampshade just the way it is!

I found this chenille bedspread I plan on making pillows with.

Some vintage sheet music and an awesome antique cheese grater I plan on hanging on my kitchen wall (Why didn't I get more of these!).

Not to mention an entire box of these shutters for free!!
Not all of this was found at the same sale, but most of it was from that awesome one. I'm really regretting not buying that cute wooden bench for 5 bucks and more cheese graters, sheet music, etc. I'm hoping Junk Bonanza this weekend will make up for it! ;) I'll show you transformations when I actually get to work on these great finds (which probably won't be soon.) *sigh*


Happy Crafting!


Tuesday, September 15, 2009

Inspiration Tuesday: Junk Bonanza!

I am super excited! My mom and I are planning to attend this on Saturday:


Junk Bonanza is a huge flea market event held this year at Canterbury Park in Shakopee, MN. It runs this week from Thursday September 17 - Saturday September 19th. I have been wanting to go to this for years and I am super excited to be able to attend the 4th annual event. "Junk Bonanza is the brainchild of Ki Nassauer, author, designer, merchant, junker and co-editor of Flea Market Style, a new home décor magazine created in partnership with Celebrity Style Editor Matthew Mead." Ki is also the founder of JunkMarket and "co-authored Decorating JunkMarket Style and Junk Beautiful, Room by Room Makeovers; had a regular column in Country Home magazine; made appearances on HGTV’s "Country Style" series and the "TODAY" show; and hundreds of public appearances, nationwide." Source I'm so excited by this that I thought I would show a few projects others have made with "junk."

Check out Kathy's message center made from an old window.

or how about this great teapot lamp?


I thought I'd keep today's post a little shorter as I have several other posts I plan on doing this week. If your anywhere near Minneapolis, MN you should consider going to Junk Bonanza. I'm so excited! Bring on the Junk!
Happy Crafting!

Friday, September 11, 2009

Funky Find Friday: ATCs

No tutorial yet this week. Everything has been crazy. Tuesday was my birthday, Wednesday was a friend's birthday, etc. Haven't had much time to do any crafting. *sniff* But for today's post, I thought I would show you my newest craft: ATCs. What exactly is an ATC you ask? ATC stands for artist trading card. According to Wikipedia, "Artist Trading Cards (or ATCs) are miniature works of art about the same size as modern baseball cards,[1] or 2 ½ X 3 ½ inches (6cm X 9cm),[2] small enough to fit inside standard card-collector pockets, sleeves or sheets.[3] The ATC movement developed out of the mail art movement and has its origins in Switzerland.[4] Cards are produced in various media, including dry media (pencils, pens, markers, etc), wet media (watercolor, acrylic paints, etc), paper media (in the form of collage, papercuts, found objects, etc). The cards are usually traded or exchanged rather than sold." Source


Source


I have recently started making a few of these fine creations. What do I do with them? Why trade them with other artists of course. Where do I do that? No other place than Craftster.org, of course! I am currently in the ATC Swap over there and loving it.

Source
There are so many different techniques people use to make ATCs, it's just amazing. If you want to check out some of these great techniques, head on over to this Craftster post or just check out their ATC Board generally. Another great place to check out ATCs is over of Flicker. I just did a search for ATC and this is what came up. So much great stuff. ATCs are also great for scrapbookers who have lots of little bits left over and nothing else to do with them.
Happy Crafting!
*None of the ATCs picture are mine, but I am planning on uploading examples of my stuff later.

Tuesday, September 8, 2009

End of Summer Giveaway Winner!

Using the Random Number Generator at Random.org....number 5 was chosen. Commenter number five was Laura (Laura said...
Metal Chair Pin Cushion.. I'd give it to my friend who loves to sew!) I will be emailing Laura and she will have 48 hours to respond to my email, otherwise another winner will be drawn and contacted. Congrats Laura!

I'm hoping to get some crafting done tonight. Included in that will hopefully be a tutorial since I haven't done one of those in awhile! Not sure what it will be on yet, so check back tomorrow to see what I come up with.

Happy Crafting!

Friday, September 4, 2009

Funky Find Friday: Ephemera and Vintage Clip Art


I've been roaming the Internet for awhile looking at vintage clip art, royalty free clip art, copyright free clip art and every other kind of ephemera. There are a lot of sites out there that have royalty free and/or copyright free stuff out there. However, one site that I have found stands out above most. The site is called The Graphics Fairy.


This fabulous site is run by Karen, a self-proclaimed paper addict, who shares scans of pieces in her own collection with the world for free. She does have a few ground rules however, which she lists on her site:

"The Graphics Fairy is an angel company. Which means you can use these images to make a product that you intend to sell. There are a few rules though so please read below:
  1. The graphics are free however you may not use more than 4 of the clip art images in any single product.
  2. In order to use these lovely visuals you will need to save them to your computer. In order to do this first- click on the item that you would like (this will open a window with a much larger image) second - right click the larger image and select "save as" in the pop up box, and then click the save button in the lower right hand corner of the box.

  3. Do not link directly to the images.

  4. If you use these on your blog, website etc. Please include a link back to this site.

  5. Have fun! "
One of the things that makes The Graphics Fairy so unique is that you can use the images in items you intend to sell. This is a fabulous find for all paper and digital crafters out there! There are over 70 different categories of clipart to chose from.

Not only does Karen offer free clip art, but she also has a free background site called The Background Fairy. Here she provides backgrounds for blogs, blog banners, buttons, wallpapers and many more items. Simply put, this woman is amazing! Karen also has an Etsy store called, what else, The Graphics Fairy! Her store features many of the actual vintage papers she scans as well as vintage jewelry and various other vintage finds.


I have been in love with everything I've seen on Karen's sites so far. If you're in need of any vintage ephemera, paper, jewelry, or backgrounds, check out her stuff. It's amazing. All of the pics in today's post come from The Graphics Fairy. Check it out!


Don't forget to enter the End of Summer Giveaway! You have until Monday, September 7th by 5:00 pm to enter.
Happy Crafting!

Thursday, September 3, 2009

We went shopping!!!

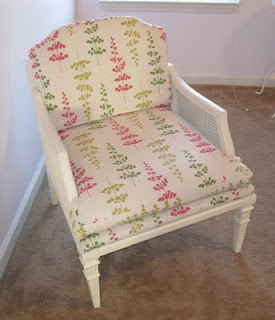
Considering the place we are in life, Hubby and I have never really bought any brand new furniture (with the exception of a cheap crappy futon which doesn't count). Everything has always been used and/or hand-me-down. We needed a couch desperately. Our living room seating consisted of two of these:


Sure they look nice, but there is no padding in them whatsoever. We're talking very uncomfortable. Plus, with two club chairs, there was no cuddling while watching a movie and to stretch out, you have to lay on our rock hard floor (I'm pretty sure there's no carpet padding under there.) So, after saving up some dough and looking at 5,000 couches over the span of the last six months or so, we finally bought one this week. We bought it from A & W Furniture* right here in town. Although we did not purchase it at their regular store, but from the clearance warehouse across the street. We picked this one up for $399 plus tax. I thought is was a good deal. It's brand spanking new and comfy. (Although Hubby is slightly disappointed there are no recliner ends.) So, without further ado, I give you our brand new couch:

Isn't it great? It's just overstuffed enough to be comfy with out being obnoxious. The color is a nice tan. I am worried about it a little over time being too light and showing stains, but we'll see. We had two nieces and a nephew over last night and a weird stain appeared out of thin air. *sigh* On the bright side however, I was able to wipe it right off the microfiber faux suede with nothing more than a warm washcloth. I hope it works like that forever! ;) I plan on rearranging the living room to fit the furniture better when we don't have to have the air conditioner in one window. Which has been most of the summer, but you know what I mean. So, what do you think of the couch?

Happy Crafting!

*Featured on Extreme Makeover: Home Edition!

Tuesday, September 1, 2009

Inspiration Tuesday: Fall

Okay, so I know it's only the 1st of September, but all the magazines and stores are sporting fall goods and the weather here has definitely been fall like the last week. My favorite season is technically summer (the warm weather, the lake, sunshine, what's not to love?). But there is just something about fall. I love the weather, the colors, the leaves, etc. So, for today's inspiration, I thought I would showcase some of the reasons I love fall so much. Besides Christmas, it's the season I have the most decorations for!

Check out this gorgeous photo from Chad & Hope Fine Photography on Etsy


At only $20 for an 8x10 matted print, you can afford to only hang it during the fall.

How about this great black and white and orange set-up from Country Living Magazine.

I love how this could work for Halloween and Fall together, but subtly.

Check out the fall color inspiration for this room at Better Homes and Gardens Magazine.

Ah. Fall colors year round? That would be great.

I love these "Harvest" letters from CraftJunkie28's Etsy shop.

Super cute for a mantle or shelf decoration.

Looking for a great door decoration that can last now all the way throught the fall? Check out Heather Bullard's tutorial.


I love everything about this arrangement; the mason jar, the chicken wire, hydrangeas, bird, and the ribbon! What a great accent to any room.

I love fall!! I'd forgotten just how much till I started putting together this post. Expect to see more fall decorating ideas from me in the future! If I get ambitious enough, I might even try to clean my house tonight and get out my fall decorations after Hubby and I go couch shopping and make supper... and separate grapes from stems... and bottle wine....okay maybe it won't happen tonight, but hopefully soon! I'll try to get to that this week and take pics to share with you.

Happy Crafting!

LinkWithin

Blog Widget by LinkWithin