I had planned on doing this project for awhile now to put in my new office and finally decided to get it done last night while hubby was at softball. I noticed today that Kelly from
Tearing up Houses left a comment on my last post to "show her the furniture" (okay that's not exactly what she said, but it's funny, right?) ;) So that's where the title of today's post comes from. But enough yapping and on to the refinishing!
I had this black chest of drawers that's really cute from Target's Global Bazaar line a few years ago. The finish on the top started chipping quite badly. The rest is in good shape, so I thought I'd just refinish the top somehow. Of course I forgot to take a picture before I started sanding, but this is what it looked like after sanding:
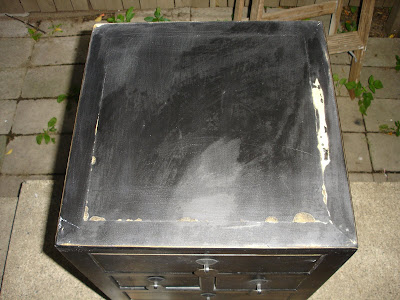 All those wood colored spots were what was chipping originally, so you get a pretty good idea of what it looked like. I thought I could try and paint the edges and then decoupage a 12 x 12 piece of black and white scrapbooking paper onto it. So I started painting with Apple Barrel Brand "Barn Red" and it looked like this:
 Hmmm....the paint isn't really covering the wood spots where the finish chipped off very well. But, I decide to plow ahead anyway. I take a mustardy (yes, I think it should be a word) yellow paint (also Apple Barrel, but can't remember the exact color) and wet brush it over the red while it's still wet and I get this:

The effect would be perfect and exactly as I wanted...if those wood spots weren't there. So I decide I'm going to have to
decoupage the whole top, but of course, the top is
approximately 16 1/2 inches square, so one
scrapbooking sheet isn't going to cut it.
My office also has yellow in it, so I figure I'll do a border of mustard yellow paper and then put on my black and white piece in the middle. So, I start measuring and cutting the yellow and arrange it like so:
 Hmm
Hmm..this pic is a little blurry, but you get the idea. I used
Mod Podge mixed with a little water and a foam brush to apply it. (Also, ignore the uneven edges, that part gets covered up anyway.) Next I put on the black and white paper:

Then I sealed it with two separate layers of the watery
Mod Podge letting it dry between each layer. Finally, I sealed it with a layer of full strength
Mod P
odge and let it dry overnight. Then, today, I put it in my office:
 This pic shows the wall color nicely, but the next one shows the cute leaf drawer pulls better:
 Whew! My quick and easy project took me a lot longer than I planned, but then again it seems they always do! ;) I hope you enjoyed this post. Tomorrow for Funky Find Friday I actually plan on showing everyone some of my personal funky finds and what I did with them.
Happy Crafting!

 The store has this pattern in several colors and sizes. Check out the store for lots of modern designer pillows.
 Love that idea!
 Bright and Modern is growing on me more and more all the time!

 And one with the leaf up:
 Pretty ugly, eh? I was originally going to paint it an off-white, distress it and antique it, but at Junk Bonanza (see posts
 Whew, that's bright! But don't worry, I'm not done yet! I took a piece of sandpaper and hand-sanded all the edges so they looked like this:
  Then I took a foam brush and brushed on a dark walnut stain we had leftover in the garage. I put on the stain in small sections and then wiped it in circular motions with a rag. I did this over the whole piece and then let it dry. I didn't like the way it looked (still too bright), so I decided to brush on another coat with a bristle brush and just work it into the wood with the brush alone. This worked much better! To show you the difference, I took a pic of two drawer fronts. The bottom one is the one done with a rag wipe, the top one is after I used a bristle brush. Huge difference!
 You can also see I


 Isn't it great? It's just overstuffed enough to be comfy with out being obnoxious. The color is a nice tan. I am worried about it a little over time being too light and showing stains, but we'll see. We had two nieces and a nephew over last night and a weird stain appeared out of thin air. *sigh* On the bright side however, I was able to wipe it right off the microfiber
  I found this neat vintage blue shelf at an auction. I knew it would work great in my blue and yellow bedroom, but it needed a little something. So, I painted the outside of the frame a grayish white and
  This has to be my favorite find ever. The town I went to college in has "spring cleaning week" every year. You can throw whatever you want on the curb and it will be picked up for free. I used to relish that week! I would spend hours driving around with my friends scouring for "upgrades" to our collage furniture. (My Mom and I actually still like to go curb shopping here if we can make it!) This is the front off an old piano that was smashed to bits. It made me sad to see the piano in that state, but on the other hand, I took this front and ran with it. I screwed in four ordinary coat hooks and
  I guess I find my entire setting above the
  I made this funky find (formerly a vintage pillowcase) into a great over the
