
 I found this neat vintage blue shelf at an auction. I knew it would work great in my blue and yellow bedroom, but it needed a little something. So, I painted the outside of the frame a grayish white and distressed it a little. Now it holds my cobalt glass collection and a few yellow accents above our bed. (Please ignore the awful wallpaper behind it. We rent this house and the paper in the bedroom is very dated.)
 This has to be my favorite find ever. The town I went to college in has "spring cleaning week" every year. You can throw whatever you want on the curb and it will be picked up for free. I used to relish that week! I would spend hours driving around with my friends scouring for "upgrades" to our collage furniture. (My Mom and I actually still like to go curb shopping here if we can make it!) This is the front off an old piano that was smashed to bits. It made me sad to see the piano in that state, but on the other hand, I took this front and ran with it. I screwed in four ordinary coat hooks and TaDa! Instant alternative to a full hall tree. Other notable finds from spring cleaning week include(don't have pics right now, will get soon): a stained glass window (that's right!) with only one tiny broken piece of glass, antique dressers, blue mason jars...the list goes on! Incidentally, my Mom and I went to spring cleaning this year and found no less that three piano's thrown out!
 I guess I find my entire setting above the kitchen cupboards fun and funky, but the best find has to be the tea kettles. One is copper and the other aluminum. I got a whole box of these babies at an auction for $1 and split them with my Mom.
 I made this funky find (formerly a vintage pillowcase) into a great over the shoulder bag. This bag works great for a green shopping bag or library books. It's hard to tell in the pic, but there is a tabbed pocket on the front. The straps are simply the sides tied in knot and it's lined with yellow and white gingham.

These cute owl bookends I found in a thrift store. They are plaster and were formerly painted 70's gaudy gold (you know the one I'm talking about, they put that color on everything from mirror frames to wall sconces. Blech!) I spray painted them black and now they hang out on the bookshelf in my office.
That's all my funky finds for this week. Have you had any funky finds lately? What did you do with them?
Happy Crafting!

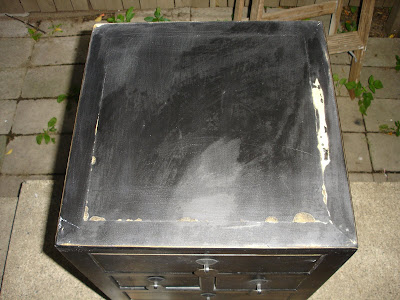 All those wood colored spots were what was chipping originally, so you get a pretty good idea of what it looked like. I thought I could try and paint the edges and then
 The effect would be perfect and exactly as I wanted...if those wood spots weren't there. So I decide I'm going to have to
 Then I sealed it with two separate layers of the watery
  This pic shows the wall color nicely, but the next one shows the cute leaf drawer pulls better:
 Whew! My quick and easy project took me a lot longer than I planned, but then again it seems they always do! ;) I hope you enjoyed this post. Tomorrow for Funky Find Friday I actually plan on showing everyone some of my personal funky finds and what I did with them.
  Here's an example of the wall texture. The color isn't quite right on this pic, but you get the idea!
  This one is closer to the right color and shows my "message center" next to my desk. The basket holds my billing sheet and phone book. The green "message" board is an old tin T.V. tray that I punched a couple of holes in with a hammer and nail and wired to hang. Messages and stuff stay on there with magnets. And then of course there is my white board calendar.
  This is directly across from my desk. It's a sitting area for clients. The framed quote is something my mom made. The owls were a gaudy gold color so I spray painted them black. I definitely think I need more touches of green and red in here. The black and yellow is a little stark by itself.
  Here's a shot of my desk for an idea on color. It's really nice dark cherry walnut toned. It matches well with the other tones in the office. It's L-shaped. Unfortunately, that's all I have done for decorating in here do far. I have a blank wall behind me, one across from the other side of my desk, and an empty spot on the same side as the message area. I plan on hanging my various diplomas up on one of the walls. I really need to find some artwork that incorporates all the colors I have for the rest, but so far no luck! I may have to come up with something creative and make my own.