
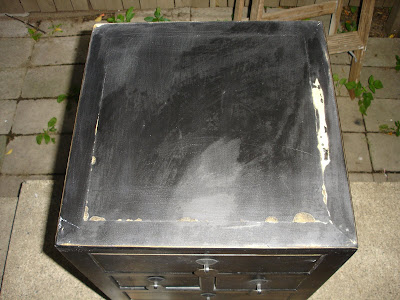
 All those wood colored spots were what was chipping originally, so you get a pretty good idea of what it looked like. I thought I could try and paint the edges and then decoupage a 12 x 12 piece of black and white scrapbooking paper onto it. So I started painting with Apple Barrel Brand "Barn Red" and it looked like this:
 Hmmm....the paint isn't really covering the wood spots where the finish chipped off very well. But, I decide to plow ahead anyway. I take a mustardy (yes, I think it should be a word) yellow paint (also Apple Barrel, but can't remember the exact color) and wet brush it over the red while it's still wet and I get this:
 The effect would be perfect and exactly as I wanted...if those wood spots weren't there. So I decide I'm going to have to decoupage the whole top, but of course, the top is approximately 16 1/2 inches square, so one scrapbooking sheet isn't going to cut it. My office also has yellow in it, so I figure I'll do a border of mustard yellow paper and then put on my black and white piece in the middle. So, I start measuring and cutting the yellow and arrange it like so:
 Hmm..this pic is a little blurry, but you get the idea. I used Mod Podge mixed with a little water and a foam brush to apply it. (Also, ignore the uneven edges, that part gets covered up anyway.) Next I put on the black and white paper:
 Then I sealed it with two separate layers of the watery Mod Podge letting it dry between each layer. Finally, I sealed it with a layer of full strength Mod Podge and let it dry overnight. Then, today, I put it in my office:
 This pic shows the wall color nicely, but the next one shows the cute leaf drawer pulls better:
 Whew! My quick and easy project took me a lot longer than I planned, but then again it seems they always do! ;) I hope you enjoyed this post. Tomorrow for Funky Find Friday I actually plan on showing everyone some of my personal funky finds and what I did with them.
Happy Crafting!
Erica!!! Great job, that looks terrific! Luv it.
ReplyDeleteLove it! Thanks for sharing!
ReplyDeleteCheck it out:
http://tearinguphouses.blogspot.com/2009/07/drawer-revival.html
It turned out great. Good job! I love it.
ReplyDeleteWay cuteness! Great job!
ReplyDeleteSuch beautiful colors! I love how it turned out.
ReplyDeleteyou did a super job! way to go!
ReplyDeletegail