Tuesday, December 29, 2009

Christmas Success!

Overall, Christmas was a success! (Despite not finishing everything I wanted to.) We made it to my parent's house in South Dakota before the big storm really hit too hard. We got snowed in on Christmas day, when we were supposed to go to my grandparent's house. But that turned out just fine. We were lazy all day, eating junk and watching movies. Saturday we slowly made the trip to Hubby's folks. Roads were icy, but otherwise travel wasn't too bad (just slow!)

Here's what it looked like outside on Christmas Day:


Also, in case you were wondering, here's how I finally finished my personalized ornaments (the ones with the epsom salt on the bottom):


I wrote each family name on there with fabric puffy paint. Then I added some cute stickers and ribbon to hang them.


Aren't they super cute hanging on the tree?

I thought I'd give you a generic preview of what's coming with the new year here on Hindrance. 1 word: Tutorials!!! I plan on doing more tutorials this year. I am still planning on participating in the various blog parties I've have in the past. But on top of that, I plan on having some blog parties of my own! Stay tuned in late January for the first Hindrance blog party and giveaway! I can't wait!

Now that I've given you my "New Year's Resolutions" (at least for the blog!), have you made any resolutions? What are they? Please share!

Happy Crafting!


Wednesday, December 23, 2009

The Big Storm??


Of course, we are all set to travel over the holidays and it's supposed to storm. Bad. From tonight through Christmas Day. That's 2-3 days of storm. Hubby and I were supposed to leave tomorrow around noon to travel to my parent's farm a few hours away. Now, hubby and I are leaving tonight (if it's not already storming too bad!). My office has decided that it will not be open tomorrow due to the coming storm. All this has me wondering. Is it really gonna get that bad? I've lived my entire life in the Midwest. I know it can get bad. But will it this time? I really hope that it won't be, at least not tonight. *sigh* I was thinking eventually it would be nice not to have to travel for the holidays, but not this year. I was thinking more like once the baby comes.
Is it storming where you are?
Is it supposed to?
What are your holiday travel plans?
Happy Crafting!
*Pic taken by me at my parent's farm

Tuesday, December 22, 2009

Christmas List Update


So....how am I doing on my list of handmade Christmas presents? Let's recap (finished items in red)
  1. Tile coasters like these (2 sets, maybe 3).
  2. 4 crocheted scarves
  3. Gingerbread men (and women) cookies
  4. Gingerbread house (If I have time! These last two have been tradition for a few years for me, the kiddos like looking at it, and if they're the last stop on the visiting train, to eat it!)
  5. Spoon Handle Necklace (specifically requested)
  6. Felted Soap
  7. Homemade body scrubs (2-3)
  8. Personalized ornaments for each family (I have done this for Dave's side of the family every year for a few years now.)

Hmmmm....not doing so hot. I have coasters, 1 scarf, gingerbread cookies, and a necklace all the way done. The ornaments are half done. Yikes! Time to get cooking on the making stuff! Ekk! I did give myself permission to nix the gingerbread house this year. If I do make one, it'll be a cheater with graham crackers for the sides rather than baked gingerbread. I also have to make a baby blanket for a friend, but that doesn't need to be done until New Year's.

*sigh* I guess I better get a move on!

Happy Crafting!


*Pic taken by me at my parent's farm

Inspiration Tuesday: Rooms for the Baby

Last night I had a moment of panic when I realized that the baby is due the first week of April. That means we have less that four months to buy a house and decorate a nursery. (I don't know if the house will actually get bought before we have the baby, but a girl can dream!) I have some ideas of what I want to do for decorations. We aren't finding out if we are having a girl or a boy, so the decorating will have to wait until after the baby is born anyway. Anywho, enough rambling. Because of all of this, I thought I would showcase some inspiration for nursery (or even older kid's) rooms for today's Inspiration Tuesday.

I have thought about doing a red, black, and white room if we have a boy. Like this one:

*Source

I don't know if I'll be bold enough to paint those stripes on the walls, but I love the look of red, black and white all together.

But then again, a nautical themed room would also be super cute.

*Source


I love the ship graphic! Super cute.

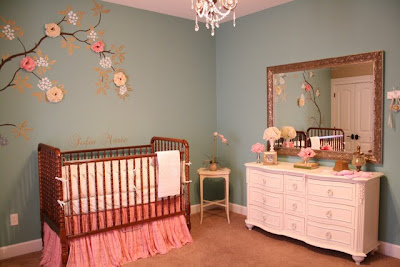
I've been thinking for a girl, I would do turquoise and red. Here's one that incorporated yellow and a few other bright colors that's nice:

*Source

I had thought I would try to stay away from being too girly...but then I saw this:

*Source

Adorable!


Then there's this one:

*Source


I love it!

I also saw a recent episode of Designed to Sell on HGTV, where they took a cute toile fabric that was turquoise blue and really bright pink and designed the whole room on that color scheme. They painted the walls blue (similar to the color on the wall in the third pic above) and the furniture the bright pink. It was super cute. I cannot for the life of me right now find either a picture of the room, or the fabric. I'm currently scouring fabric sites to locate it. If I find it, I'll let you know!

Tip: Today most of the ideas I found on Design Dazzle and then tracked down to the original posts. It's a great place to start looking at ideas for nursery and kids rooms!

Got a nursery that you decorated? Want to share? Leave a comment here or contact me through my profile!


Happy Crafting!


Free Shipping Upgrade!


I know it's a little too late to get it there by Christmas, but from now until December 31st, I'm offering a free upgrade to priority shipping in my Etsy shop. It could be helpful if you are celebrating Christmas late, or if you get some money for Christmas you need to spend! ;)
Happy Crafting!

Tuesday, December 15, 2009

Cinnamon Dough Ornaments

I tried my hand at cinnamon dough ornaments last night. They look just like gingerbread and smell delicious!

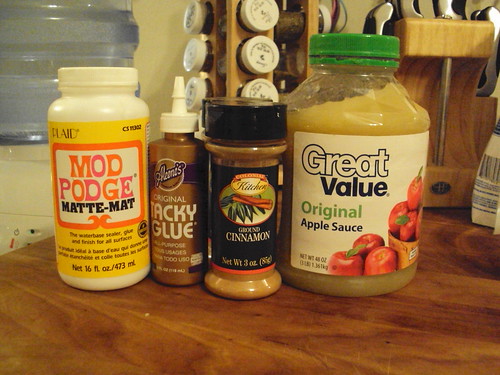
I used Martha Stewart's recipe found here. It calls for:


  1. 1 cup ground cinnamon
  2. 1/4 applesauce
  3. 1/2 cup of craft glue

First, you measure out and mix the cinnamon and the applesauce (I ended up adding a couple of tablespoons more applesauce to get a consistency I liked). Then you add the craft glue. I didn't want to use up all of any one given glue, so I used a 1/4 cup of tacky glue and a 1/4 of Mod Podge. Martha's instructions say to let the dough sit an hour. I'm impatient and was worried about the glue getting too dry, so I only let my sit 30 minutes or so. Here's what the dough will look like:

After you let it sit a bit, take a small hunk of the dough (about 1/4) and roll it out with your rolling pin. Here's some tips for working with the dough:
  1. If it gets dry and starts cracking, sprinkle it with a little tiny bit of water. This helps smooth the dough.
  2. Use dry cinnamon like you would flour when rolling out cookies. it keeps the dough from sticking to your rolling pin.
  3. Don't be afraid to add a little extra applesauce if the consistency of the dough is too tough. Just make sure it gets mixed in really well.

Once your dough is rolled out, you can use cookie cutters to cut out shapes, or like Martha Stewart, you could print out templates on card stock and use a knife to cut around them. I did both. Don't forget to poke a hole for hanging the ornaments. I used a straw for the bigger ones and a small pastry bag tip for the little ones.


Here's the "cookies" drying on a rack. You are supposed to let them air dry for 24 hours, flipping them over every 6 hours or so. Or you can bake them at 200 degrees for about 2 hours, flipping once about half-way through.

Mine are still drying, so no finished pics yet. I will update this post when I'm able to get them decorated. Martha glittered her bird shapes. I want mine to still look like gingerbread, so I'm planning on using paint pens, puff paint and things like that to decorate them. I plan to put the small ornaments on my little kitchen Christmas tree. I'm so excited to finish these! If you try these, please show us pics!

*Update: I decorating the dried ornaments mostly using fabric puff paint. It worked great! Here's some of my favorite:


Happy Crafting!


Sharing this at:


DIY Day @ ASPTL

The DIY Show Off

Monday, December 14, 2009

Christmas Tour of Homes

I'm joining in The Nester's Christmas Tour of Homes. A bit of a warning before we start. I did not clean my house for this tour. I simply tried to take pics around the mess. So if you see any of that mess peeking in some of the pics, please ignore! ;) That being said, let's get started!

I'll start in the living room. I used our existing light fixture and turned it into a Christmas ball chandelier. (Just pretend that one of the light covers isn't missing, hubby broke it and I haven't gotten around to finding a new one yet. Remember, even The Nester says "It doesn't have to be perfect to be beautiful!"

Here's our little Charlie Brown tree. It's got an assortment of ornaments on it. I don't have a real theme for it. The star is a glittery snowflake that I got at the dollar store. I love the red bead garlands.


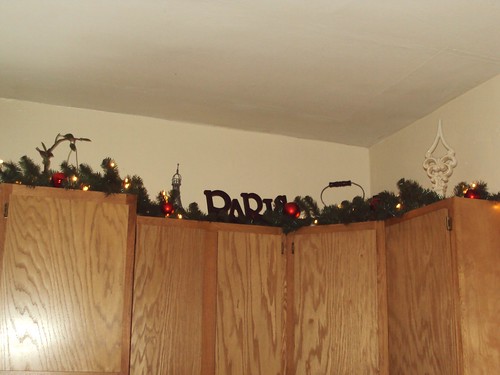
Here's some garland on top of the built in corner cupboard. I had planned on putting more Christmas stuff in there on display, but haven't gotten that far yet!


Here's the doorway that leads from the living room to the dining room. I hung our stockings here and put balls along the doorway using ornament hooks.

Next is the dining room. Here's the centerpiece I have on the buffet. You might recognize the glittered/beaded fruit from that $5 thrift store basket. The candle is one of those battery flicker ones. (I love this so much and need to buy a bunch more!)


Here's the built in next to the buffet. I used to have this ribbon on my tree, but decided to use it here instead this year. I've been sticking the Christmas cards in the window frame.


On the opposite wall is the china hutch. I put lighted garland on the top and a few touches of Christmas inside (although it's hard to see that)

Next room is the kitchen. Here's the top of my cupboards. I just added a lighted garland to the stuff I have up there year round. I also added some red balls to the garland.

Here's a shot of my Santa chef. He sits on the little display cabinet above my sink.


I did take a few outside shots. I will try to update this a bit with some night shots if I can get them to turn out.

Here's the real evergreen wreath on the front door.


And you may have already seen the cute basket from the $5 thrift store goodies I put together.


Well, that's it for the Christmas decorations so far! I don't think I'll get really anymore decorating done this year. It's less than two weeks until Christmas and I still have presents and cookies to make! I'm hoping to get to those cinnamon ornaments on my to do list tonight, so stop by tomorrow and check them out. In the meantime, head on over to The Nester's and check out the other Christmas tours!

Happy Crafting!


Thursday, December 10, 2009

New Christmas Decorations

The last couple of days I've been working on Christmas decorations. First, I needed a tree skirt. I had bought some cute fabric when it was on clearance last year. I made a square-shaped skirt with patterned fabric on the top, batting in the middle and solid colored fabric on the bottom. I sewed quilt binding around the whole thing. Here's some really bad pics of the whole she-bang (still using camera with no flash, and I took pics at night):

Here's a close-up that shows the back side as well: The fabric has Santas, reindeer and sleighs all over it with the lyrics of jingle bells.

Tree without a skirt: boring! And look at all the cords showing!


Tree with skirt:
Much better! My skirt is a little big for the space, but oh well.

The next project I did is for the outside steps. I found this basket at the thrift store with all the goodies inside it for only $5!

Look at all the good stuff inside!

Red berry picks, fake sugared fruit, and even some red Christmas balls! I ended up only reusing the berry picks for this project, but I did use the sugared fruit elsewhere which I'll show you later.

I took a cheap fake garland from Walmart and coiled it in the basket. Then I added two nicer evergreen picks in the middle to add some height (I got those from Joanne's when they were 50% off) Finally, I stuck in the berry picks for color. Here's what it looks like now:

Here's a close-up of the inside of the basket:

One of the nice evergreen picks has pine cones on it, and the other has crystal snow. I thought together they were a nice balance.

Here's the basket on it's stool on the front steps:

Well, what do you think? Not a bad looking basket for less than $10 and 10 minutes work! Plus, it's not really too Christmassy to leave out all winter long. (Or at least until my hubby gets tired of shoveling around it!) ;)
Got any small projects you've finished lately?
Happy Crafting!
*sharing this at:

Wednesday, December 9, 2009

Quickie Project of the Week: Snow Ball Ornaments

Remember awhile ago, when I was going to post a quick, easy project every week that takes less than half an hour? And remember how I only did one of those posts? I know I'm bad at these weekly installment type posts, but one of my New Year's Resolutions is to manage this blog better, so I thought I'd get an early start. Okay, enough rambling, on to the project!

This week's quickie project is Snow Ball Ornaments:

The idea came to me when I saw all those cute snow crusted candles everyone in blogland was making with epsom salts. I always make personalized ornaments for every family on hubby's side and thought this would translate well.

Here's the needed supplies:

I took a clear glass bulb:


Put some Mod Podge on the bottom using a paint brush. You can do as little or as much as you want here. I wanted to be able to put stuff inside the ornament and still be able to see it, so I only did the bottom third or so:

Dip the ornament in a bowl full of epsom salts:

Shake off the excess and stick it upside down in something to dry!

Tada! Each ornament takes less than a minute to do. I did an entire box of nine in 10 minutes or so. I'm not completely done with mine yet (I wanted to let the Mod Podge dry thoroughly). I plan on either drawing initials on them with paint pens or using vinyl letters to say "Let it Snow" on them. I haven't decided which yet. Any thoughts?

I think this would also probably look great with colored glass balls as well, especially red ones! I'll show you mine when I get them all the way finished. Link up yours if you make some, I'd love to see them!
Happy Crafting!
*Sharing this at:
BCD Show and tell

Friday, December 4, 2009

Burlap Snowflake Tutorial

Okay, I still don't have a new camera yet, so you're going to have to bear with my crappy pictures. I was so excited to share this that I couldn't wait. I saw somewhere on blogland a tutorial for newspaper snowflakes. I was going to make those, but then the burlap post yesterday got me thinking. Why not make them with burlap?


So I give you: Recycled Burlap Snowflake Ornaments!


Here's mostly what you need for supplies:

  1. A snowflake template (printed mine off the internet onto card stock)
  2. Mod Podge
  3. Paintbrush
  4. Cardboard (in this case recycled from the back of an empty legal pad)
  5. Scissors
  6. Burlap scrap (or any fabric would work really)
  7. Buttons or other embellishment (not pictured)
  8. Glue gun (not pictured)

First: trace your snowflake pattern onto the cardboard:

(sorry for that horrible pic!)

Next, flip over your cardboard and brush mod podge over the back side of the cardboard (so you don't cover your traced lines). Make sure you put on a fairly thick coat so the burlap will stick good!

Then put your piece of burlap over the mod podge, smoothing it as you go.

Now comes the hard part, waiting for it to dry (at least that's the hard part for me!).

After it's dried for at least 10 minutes (15 would be best), turn over your cardboard and cut out your snowflake along the traced lines.


You could just leave this as it is, but I decided to put some buttons on mine with the hot glue gun (yea instant gratification!)

Then I punched a hole in the snowflake with a regular hole punch and tied a natural cotton string through the hole. You could use twine or ribbon for this too, I didn't have any twine! :(

TaDa! You're done!


Wouldn't a bunch of these look great on a rustic themed tree? Or as a great handmade package topper? You could do any shape you wanted, don't limit your imagination to snowflakes. I can see these as deer, trees, the sky's the limit!

Also, you could probably eliminate the need for cardboard by treating the burlap with fabric stiffener and then tracing and cutting your pattern directly from that. I haven't tried this method, so I can't guarantee the burlap won't unravel at the edges.

Let me know if you try this project! I'd love to see your version.

Happy Crafting!


*P.S. Two tutes in two days, I am on a roll! ;)

*Sharing this at:

The Inspired Room's Holiday Linky Friday

Today's Creative Blog: Get your Craft On

A Soft Place to Land's Do it Yourself Day

LinkWithin

Blog Widget by LinkWithin